NoMachine / NX
NoMachine (formerly NX) is a computer program that handles remote X Window System connections which offers several benefits over traditional X forwarding. NoMachine can greatly improve the performance of X Windows and is our recommended method of interacting with GUIs and visualization tools. It also provides functionality that allow a user to disconnect from the session and reconnect to it at a later time while keeping the state of all running applications inside the session.
Our current default desktop is GNOME. Most of the instructions on this page will help you use our GNOME desktop. If you would prefer to use our lighter-weight Xfce desktop, you will find directions further down this page.
If you don't want to reauthenticate with your password and a new one-time password every time the NoMachine Client is disconnected (e.g. if you close your laptop), you can connect with an ssh key generated by sshproxy. You will need to regenerate the ssh key with sshproxy once a day, but otherwise the NoMachine Client will automatically reconnect.
If you would prefer not to use the sshproxy service, you can still connect to NoMachine. You will need to enter your password + OTP (no spaces in between) every time you log on to NoMachine.
Installing the NoMachine Client
To use NoMachine at NERSC, you will need to download the NoMachine client.
New connections
New NoMachine users will see this message when they first log on via the client:
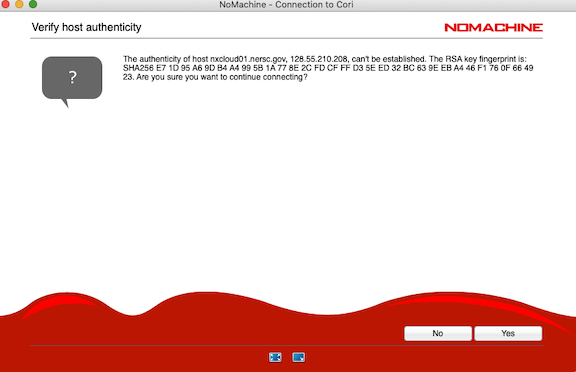
If you would like to verify the authenticity of the key, please see published key fingerprints.
Danger
If you notice that the key that NoMachine displays does not match the keys published on the NERSC website , please stop and contact us immediately at the NERSC Help Desk.
Configuring your connection
Mac or Linux connection with sshproxy
Check out this video (note the Client version is old but the general settings remain the same) which shows you how to install NoMachine from scratch and configure using sshproxy.
- Not shown in video but required: To enable sshproxy in NoMachine, you will need to edit one of the NoMachine config files on your local machine. You must edit this file while NoMachine is closed/not running. First exit the NoMachine program and then edit
$HOME/.nx/config/player.cfgand change the following key fromlibrarytonative:<option key="SSH client mode" value="native" /> - Install sshproxy on your laptop and generate an SSH key. Note that you must do this once every day to generate a new key.
- Open the NoMachine client and click on the green Add icon in the upper left corner
- Under Address > Name the connection something like "Connection to NERSC"
- Under Address > Host must be
nxcloud01.nersc.gov - Under Address > Protocol set it to
ssh. This should automatically change the Port to 22. - Under Configuration > Authentication, select "use key-based authentication with a key you provide"
- Click Modify. Fill in the path to the ssh key you generated (usually
/Users/<yourusername>/.ssh/nersc) and click the back error at the top left. - Click the yellow Connect button at the top right. Enter your NERSC username.
- Verify the key. Create a new desktop. You should land at the NERSC homescreen.
- To safely log out, click the
log outbutton on the left hand menu of the GNOME desktop. If you clickxwithout logging out, your session may hang which will prevent you from starting a new session. If you think this has happened to you, please open a ticket at the NERSC Help Desk so we can help you reset your NoMachine access. - To use this connection in the future, when you start the NoMachine client, just click in the icon you named "Connection to NERSC"
Windows connection with sshproxy
- To enable sshproxy in NoMachine, you will need to edit one of the NoMachine config files on your local machine. You must edit this file while NoMachine is closed/not running. Make sure you can view hidden files and navigate to
C:\Users\<yourusername>\.nx\config\player.cfg. You can edit this file using Notepad++ or other programs that allow you to edit hidden files which cannot be edited by default in Windows. Change the following key fromlibrarytonative:<option key="SSH client mode" value="native" /> - Install sshproxy on your laptop and generate an SSH key. Note that you must do this once every day to generate a new key. Use this command to generate your key:
sshproxy.exe -u <yourusername> --format openssh -o nersc - Open the NoMachine client and click on the green Add icon in the upper left corner
- Under Address > Name the connection something like "Connection to NERSC"
- Under Address > Host must be
nxcloud01.nersc.gov - Under Address > Protocol set it to
ssh. This should automatically change the Port to 22. - Under Configuration > Authentication, select "use key-based authentication with a key you provide"
- Click Modify. Fill in the path to the ssh key you generated in step 1 (usually in the place you installed
sshproxy.exe) Make sure you selectnersc(rather thannersc.pub) as your private key. Click the back arrow at the top left. - Click the yellow Connect button at the top right. Enter your NERSC username.
- Verify the key. Create a new desktop. You should land at the NERSC homescreen.
- To safely log out, click the
log outbutton on the left hand menu of the GNOME desktop. If you clickxwithout logging out, your session may hang which will prevent you from starting a new session. If you think this has happened to you, please open a ticket athelp.nersc.govso we can help you reset your NoMachine access. - To use this connection in the future, when you start the NoMachine client, just click in the icon you named "Connection to NERSC"
Connection without sshproxy
- Open the NoMachine client and click on the green Add icon in the upper left corner
- Under Address > Name the connection something like "Connection to NERSC"
- Under Address > Host must be
nxcloud01.nersc.gov - Under Address > Protocol set it to
ssh. This should automatically change the Port to 22. - Under Configuration > Authentication, select "Use password authentication"
- Click the yellow Connect button in the top right corner
- Type your NERSC username and password+OTP. Don't save your password in the connection file; you will need to enter a new OTP every time you log on.
- Verify the key. Create a new desktop You should land at the NERSC homescreen.
- To safely log out, click the
log outbutton on the left hand menu of the GNOME desktop. If you clickxwithout logging out, your session may hang which will prevent you from starting a new session. If you think this has happened to you, please open a ticket athelp.nersc.govso we can help you reset your NoMachine access. - To use this connection in the future, when you start the NoMachine client, just click in the icon you named "Connection to NERSC"
Using Xfce instead of GNOME
Would you like a lighter-weight desktop?
The current default desktop environment in NoMachine is GNOME. However, some users have found that this desktop can sometimes be laggy or graphics may be displayed with poor resolution. If you have experienced these issues (or simply would prefer a lighter-weight environment) we recommend trying our Xfce desktop.
How to use our Xfce desktop
To use our Xfce desktop instead of our default GNOME desktop:
- Make sure you have completely logged out of any open NoMachine sessions. To do so click
log outin the bottom left corner of the GNOME desktop menu. - Return to the NoMachine connection page. Create a new connection file following either the with/without sshproxy directions above. To help your future self, consider calling it
Xfce connectionor something similar. - Click connect.
- Once you've connected, choose
Create a new custom session - On the next screen, click
Run the following commandand fill in/bin/startxfce4and clickRun the command in a virtual desktop - This should give you a session with the Xfce desktop
- Then you can connect to Cori clicking on the small terminal icon on the bottom of the screen and typing
ssh -X cori.nersc.gov. - To log out of Xfce, click on the box with your name at the top right corner. Select
log out. Then clicklog outagain. It may take several seconds to fully close your session. There is also alog outoption under the upper left menuApplications/Othersbut this log out button does not currently work.
Troubleshooting
If you are having trouble connecting to NoMachine, please try these steps:
-
Log into Iris to clear any login failures. Access to NoMachine uses your NERSC user name and password. If your password is mistyped five times, NERSC will lock you out of Our systems. Logging into Iris will automatically clear these failures. This will also let you know if your password is expired (which would prevent you from accessing NoMachine, among many other things).
-
Create a new connection file following the instructions above. NX will often "update" the configuration file to try to save your settings and sometimes this file can get some bad settings. You must have the new NoMachine player AND an updated configuration file to connect to the NoMachine service.
-
Try to ssh directly to the NoMachine server. You can do this with the command
ssh <nersc_username>@nxcloud01.nersc.gov
and your NERSC user name and password+one-time MFA password (with no spaces in between). If your access to the NoMachine server is blocked by a local firewall or something else and you can't connect via ssh, you will also not be able to connect with the NoMachine client. If this is the case, please contact your local IT department.
- If you're using sshproxy, test the sshproxy key by using it to ssh to the NoMachine server. You can do this with the command
ssh -i ~/.ssh/nersc <nersc_username>@nxcloud01.nersc.gov
If this fails and Step 3 works, there may be a problem with your sshproxy key, please open a ticket with NERSC to diagnose the issue.
If you've tried these steps and still cannot connect, please open a help ticket. In this ticket, please include the following information:
- The type of system you're trying to connect from (i.e. Mac, Windows, Linux, etc.).
- A screen capture of the error you get (if possible).
- A tarball of the NoMachine logs. You can find instructions for how to bundle your NoMachine logs on the NoMachine website.
Customizing your NoMachine setup
Font size is too big or too small
To change the font size inside your terminal: In the menu of Konsole Application, choose "Settings"->"Manage Profiles", then click "Edit Profile...", now you can change the font size in the "Appearance" tab, after changing, click "OK" until you are back to the terminal. Now every new terminal window you open will have the new font size.
To change the font size of your menu bars/window titles: Right click on an empty desktop then choose "Konsole", inside the Konsole, type "kcmshell4 fonts". Then you have a dialog box to change your font size.
Resizing the NoMachine screen
With the latest NoMachine Player (5.0.63 or later), the most efficient way is to enable "Remote Resize" in the NoMachine menu:
- Connect to NoMachine
- From the desktop, bring up the NoMachine player menu with a hotkey: Mac: Ctrl+Option+0, Windows: Ctrl+Alt+0, Linux: Ctrl+Alt+0
- Choose the "Display" submenu, then toggle the "Remote Resize" button. You can also choose "Change Settings" to manually change the resolution.
Customize your NoMachine terminal
If you dislike the default NoMachine terminal color scheme (white background, dark text), you can open a terminal from the Show Applications menu at the bottom of the menu bar on the left hand side of the screen (it looks like 9 dots). Once you have opened your terminal, click Edit → Preferences in the terminal menu. If you click the Colors menu at the top of the window, you can uncheck the Use colors from system theme box. You can then choose the color of the background and text you prefer.
If you like to make adjustments from the command line, open a terminal/konsole from the Show Applications menu and enter:
dconf write /org/gnome/terminal/legacy/profiles:/:b1dcc9dd-5262-4d8d-a863-c897e6d979b9/use-theme-colors false
This should permanently adjust your terminal color settings to use a dark background with light text.
How to adjust keyboard language
To change your keyboard language from the default (US English), click the Show Applications menu at the bottom of the menu bar on the left hand side of the screen (it looks like 9 dots). Then click the Settings icon → Region and Language. Under Input Sources, click the plus arrow on the bottom left hand side. This should open a list of additional options (for example: Spanish (Spain)). Under this menu will be another, more detailed submenu with options such as Spanish (Macintosh). Choose your option and click the Add button on the upper right hand side. Then under input sources, make sure your new option is highlighted. You can click the keyboard icon on the bottom right to see how the keys in your new configuration are arranged.