Iris Guide for Users
Getting Started
The Iris system is a web portal that contains user, login name, usage, and allocations information.
First Time Login
The first time you log in to Iris, you will have to change your NERSC password. Your NERSC password is also your Iris password and all NERSC passwords must abide by certain requirements.
Logging In
To log into the Iris system, point your web browser to the URL https://iris.nersc.gov. Please use this URL as a bookmark for Iris. If you have bookmarked a different URL, you may have to log in twice.
Click the Login button, and you will be redirected to NERSC web login page. Enter your NERSC username, password and, if MFA (Multi-factor Authentication) has been set up, a MFA one-time password (OTP).
Reset NERSC password
If you forgot your password, follow the instructions in the 'Forgotten Passwords' section of the Password webpage to reset your password.
Forgot your username?
If you forgot your username, click the 'Forgot your username' link. Enter your email address and a MFA OTP to receive your username by email. NERSC will email you instructions for retrieving the username.
Reset MFA tokens
If you have to reset all your MFA tokens because, for example, you lost the device where MFA tokens are configured, please follow the instructions in the 'If Your Lost Your Tokens' section of the MFA webpage.
Problems Accessing Iris?
If you still have a problem with your username or password, contact the NERSC Account Support Office by sending email to accounts@nersc.gov.
If you can't log in due to a different reason, contact the NERSC Consultants by opening a trouble ticket from NERSC Help Portal (https://help.nersc.gov).
Navigating Around Iris
Menu bar
The menu bar at the top of the page has several menus, allowing you to access different parts of Iris.

-
The Iris icon in the top left corner is clickable and serves as the Home button. When clicked, it brings you back to the "Homepage" which displays your compute allocation usage summary info.
-
The Projects pull-down lists the projects that you have access to and allows you to see usage info for each.
-
The Reports pull-down provides various usage report options.
-
The search box allows you to quickly get the information you need about individual users or projects.
-
The account pull-down under your account name in the top right corner contains menu for displaying what your Iris roles are (e.g., User, PI, ...) and what permissions you have in Iris. Someone in your project group whose role is the PI, a PI proxy or a Project Resource Manager can edit in Iris how much compute time a user in the group is allowed to use.
To logout from Iris, select the Logout menu item.
For certain menu items, there is also a sub menu bar under the top menu bar, consisting of tabs for different menu items. When this bar appears, the first value on the left refers to the context for the page displayed. For example, if the sub menu is about your account itself (that is, when the Iris icon is selected), the label will be your full name, as shown in the above figure. If the sub menu is about an allocation account, it will display the allocation account name.
These menu bars are always available to you, and do not scroll when you scroll down the screen.
Sorting the Display Data
Displayed data can be sorted by a column by clicking on the column heading. By default data is sorted in the ascending order. Clicking on the heading again, you can toggle the sorting order.
The column selected for data sorting has its column heading marked as chosen.
Iris Icon (in the top left corner)
When you login to Iris, the Iris icon in the menu bar is selected by default. This menu contains info about your account, your allocation usage, records of jobs that you ran, file storage usage, your NERSC MFA (Multi-Factor Authentication) setting, and your profile etc. -- all about your account.
It has several tabs to show different aspects of your account: Compute, Jobs, Storage, Roles, Groups, MFA, Profile, and History. See the above figure.
Allocations of NERSC computer time are awarded into project accounts.
Compute
This menu lists all the compute allocation accounts that you have access to, and shows YTD (year-to-date) usage for each. This page shows the following, for each allocation account:

-
Project: All the compute allocation accounts that you can access to. If you click on a project, it will show details about the allocation account itself.
-
Default: The default allocation account to charge your usage to when the charging account is not explicitly specified during batch job submission. if you want to change the default account, just click the box in the corresponding row.
-
Charge: Charged NERSC hours; compute usage times (called "NERSC hours") are charged according to the scheme explained in the Queue Policy page.
Click on the charge value, and the page will display detailed info about your daily usage for the allocation account.
-
Raw: Raw node-hours used.
-
Avg CF: Average charge factor ratio. If all of your batch jobs ran with the 'regular' QoS with no discount, the ratio will be 1.0.
-
Remaining: Remaining balance in NERSC Hours.
-
% Remaining: Remaining balance as the percentage of the NERSC hour quota.
-
'Allocated Hours' or 'Allocation % of Project': Quota for the project allocation hours that your project's PI, PI proxy or PI Resource Manager allocates for your usage. They allocate an amount using either the absolute NERSC hours or a percentage.
-
'Last Updated': Time stamp for the last usage update in Iris.
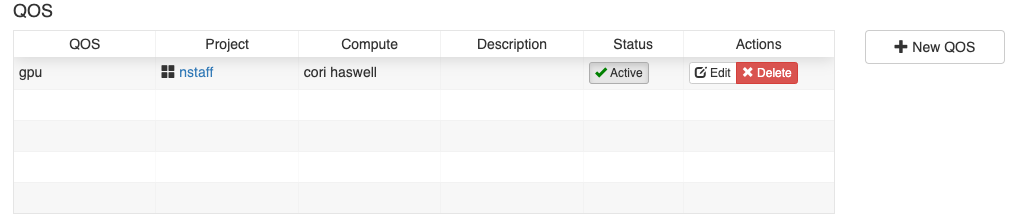
There is a section 'QOS' at the bottom, listing special QoS' that your account is permitted to access to, in order to use a special resource (for example, Cori GPU testbed) under a special arrangement. If you don't have any special QoS, then the table is empty.
Jobs
This page lists jobs that you ran on NERSC machines, along with a time-series plot for the jobs on the top and individual jobs at the bottom.
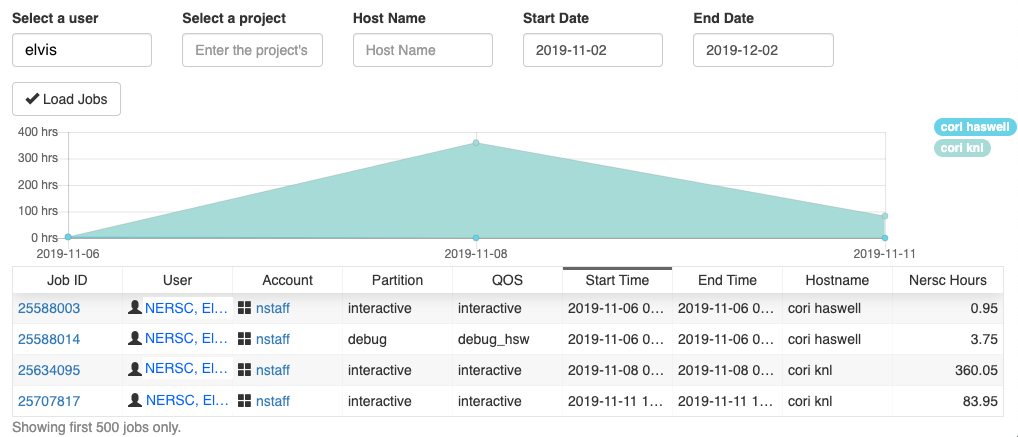
By default, the page lists the jobs you ran during the last one month. To view job data with different start and end dates or for a specific "Host" (e.g., cori haswell, cori knl, ...), etc., enter the appropriate values for your search, and click the 'Load Jobs' button.
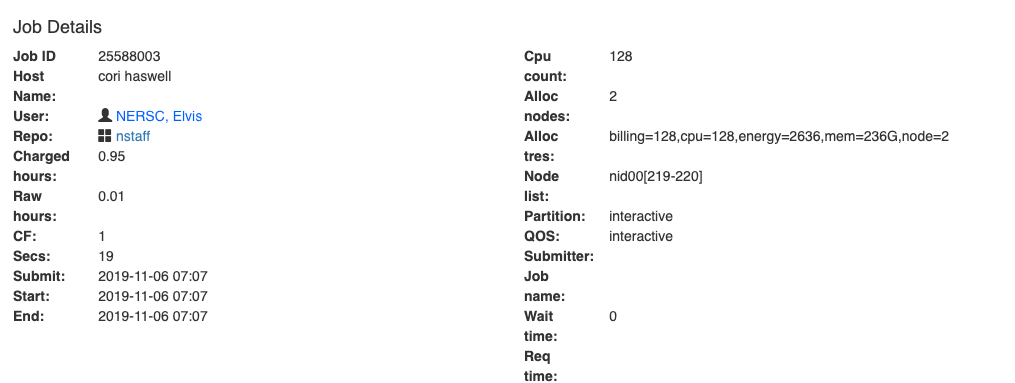
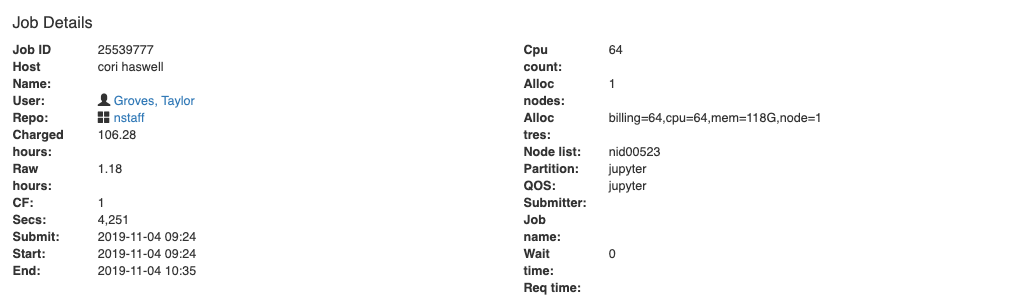
Clicking on a job ID link from the displayed result, you will see a summary about the job such as host; job name; allocation account; charge info; submit, start and end times; the compute nodes used, etc.
Below there is a section titled 'Job Transfers'. This area provides a record of all deposits and withdrawals made to/from your project's allocation accounts.
At the bottom, there is another section titled 'DataCollect Info'. When the 'More Info' button is clicked, it shows details for individual job steps (that is, individual srun instances), such as the working directory, arguments, srun parameters, etc.
Storage
This area is about your usage of the global home file system and the HPSS archive system.
-
A time-series plot for home and HPSS space usage is provided at the top of the page.

-
Home: Space and inode usage logs for the global home file system.

-
HPSS Archive: Space and inode usage logs for the HPSS archive system.

This area shows usage and account settings per user for the project's HPSS allocation. PIs and project managers can assign user quotas.
The HPSS storage system tracks usage for each user, but it does not know which allocation account the user belongs to. HPSS user usage information is transmitted to Iris once a day. Iris distributes the user's usage into their storage allocations using their '% to Charge to Project' values. To change the values, type in the percent to assign to each project. Iris initially assigns your project percents based on the relative sizes of your storage allocations. For more info on HPSS charging, please see HPSS archive system.
-
Also you can generate HPSS tokens here which can be used for accessing the HPSS archive system.
Roles
This page shows user's roles in three different context: Iris Role, Project Role and DOE Administrative Role.
-
Project Role: The role of the user in a project: PI (Principal Investigator), PI proxy, Project Resource Manager, Project Membership Manager, User, or No role. The last role is assigned to collaboration accounts.
-
Iris Role: The project administrative role in Iris web portal (that is, PI, PI proxy, Project Resource Manager, Project Membership Manager, User, DOE Admin, and various NERSC staff roles), which is closely tied to the project role. When a user has a high enough role in Iris, the user is able to edit other member's roles in the project. For example, if you are the PI of your project, you can edit compute allocation for your members in Iris.
To see detailed info on all Iris Roles and their permissions, select the 'Iris Roles' menu under the account pull-down menu.
-
DOE Adminstrative Role: This role is relevant to only DOE managers and NERSC allocation staff members, for managing allocations.
Groups
The display shows which Unix groups you are a member of. You will see the numeric IDs and the associated allocation accounts, too.
MFA
The page lists your MFA (Multi-Factor Authentication) tokens. For more info on this topic, please see the MFA webpage.
You can create, delete, and test each token. To add a new one, click the '+ Add Token' button on the right. You can have up to four tokens. To delete one, click the '- Delete' button.
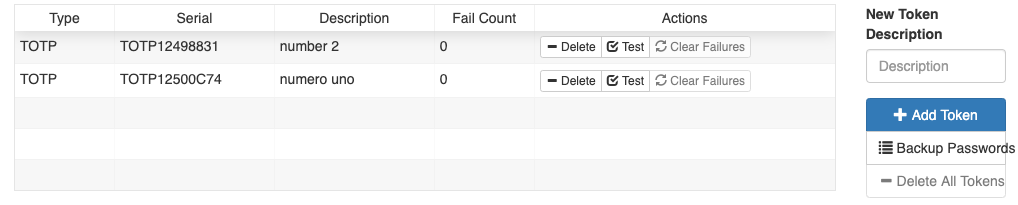
Moreover, you can clear login failures accumulated on the NERSC OTP (one-time password) server as a result of entering the wrong OTP too many times. These failures could prevent you from logging in for a time. They are cleared automatically after 15 minutes. Note that the login failures mentioned here are different from the login failures that would lock you out of a NERSC host (e.g., Cori) indefinitely for entering the incorrect password too many times. These failures can be cleared from the 'Details' menu below.
To generate backup one-time passwords, click the 'Backup Passwords' button.
The '- Delete All Tokens' button is reserved only for NERSC administrators.
Profile
This page is broken into several sections related to user profile and access modes for NERSC resources. The first two sections are about your contact info. In order to communicate effectively with users and in order to abide by DOE computer use regulations we must have the following information for each user: name, email address, work phone number, and work institution (organization), etc. Please keep your personal information current. This is important so that we can contact you.
-
User Organization: Information about your work institution.
-
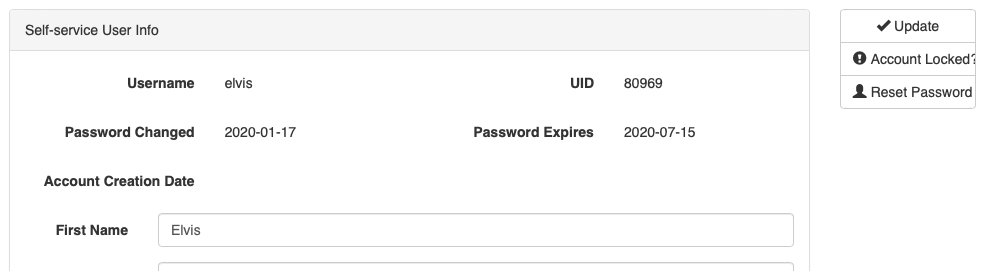
Self-service User Info: User contact information. If your information changes, please correct the info and then click the Update button at the right.
If you are locked out of a host after entering incorrect password too many times, click the 'Account Locked?' button.
You can reset your NERSC password by clicking the 'Reset Password' button. For instructions, please see the How To Change Your Password in Iris section.
-
Server Logins: The NERSC hosts that you have access to (e.g.,
cori,datatran, etc.) are listed. The login shell and other login account information for each host are displayed.You can change the login shell for a host by clicking on the 'Edit' button under the 'Actions' column for the corresponding host.
-
SSH Keys: If you are allowed under a special arrangement with NERSC to use ssh keys for accessing a collaboration account, you can register the public key here. In that case, click the '+ New SSH Key' button to add a public key.
For accessing a regular user account, registering an ssh public key has no effect at all because using a personal key pair for authentication is not allowed.
-
Gridcerts: You can register your grid certificate here. To add a new grid cert, click the '+ New Cert' button.
-
API Token: You may generate an API token in order to use the Iris API. You can have one API token at a time. To generate a token, click the 'Generate API Token' button to the right. Then, the text box below indicates that you have one. To revoke the existing token, click the 'Revoke API Token' button.
Projects menu
While the previous menus (the one provided when the Iris icon is clicked) focus on resource usage, this menu is about resource usage for a project as a whole. To select a project for which you want to check the resource usage, first click on the top 'Projects' pull-down menu from the top menu bar. It lists all the allocation accounts that you have access to. Then, select the account that you are interested in checking.
Compute
The display shows YTD (year-to-date) usage of the selected allocation account, with a quick summary about the allocation account, followed by time series plots and then a table for the usage per member of the project.
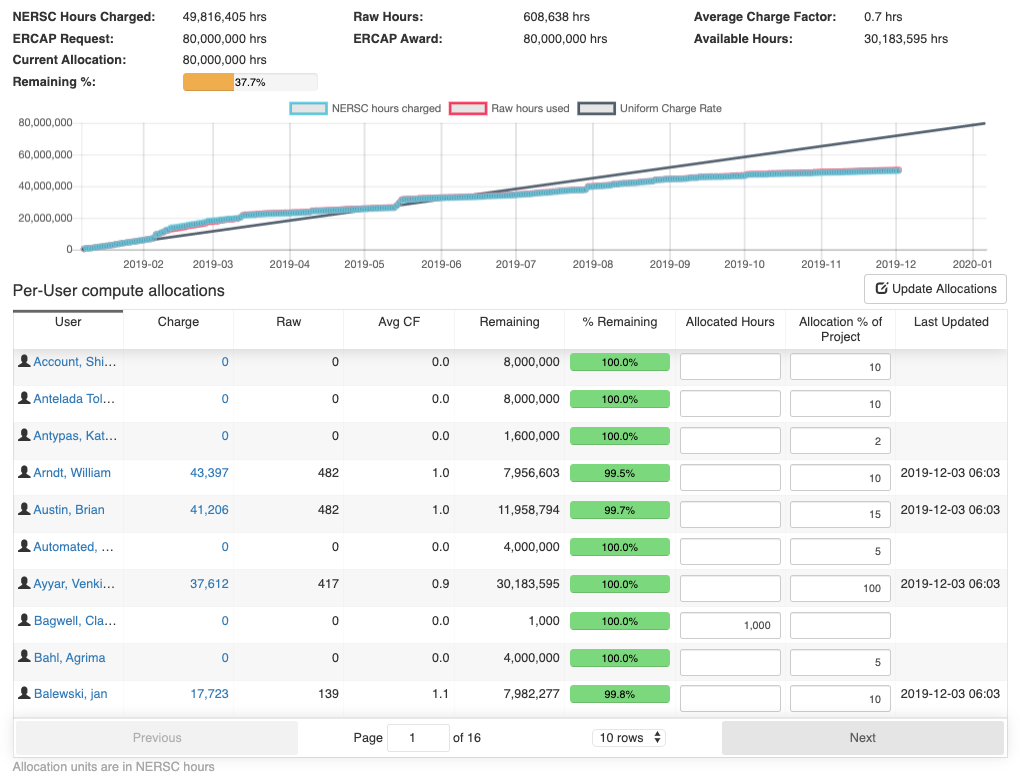
The summary lists the NERSC hours charged, raw hours used, the average charge factor ratio, the initial allocation award, the balance, etc.
The usage plots include NERSC hours charged and raw hours used over time. These are compared to the uniform charge rate plot as a reference.
The usage table includes the following columns:
-
User: All the members belonging to the project. If you click on a user, it will show details about usage of all allocation accounts by the user. This is the same user account level 'Compute' menu display for the user.
-
Charge: Charged NERSC hours; compute usage times (called "NERSC hours") are charged according to the scheme explained in the Queue Policy page.
Click on the charge value, and the page will display detailed info about your daily usage logs for the allocation account since the beginning of the allocation year.
-
Raw: Raw node-hours used.
-
Avg CF: Average charge factor ratio. If all of your batch jobs ran with the 'regular' QoS with no discount, the ratio will be 1.0.
-
Remaining: Remaining balance in NERSC Hours.
-
% Remaining: Remaining balance as the percentage of the NERSC hour quota.
-
'Allocated Hours' or 'Allocation % of Project': Quota for the project allocation hours that your project's PI, PI proxy or PI Resource Manager allocates for users. They allocate an amount using either the absolute NERSC hours or a percentage.
-
'Last Updated': Time stamp for the last usage update in Iris.
Jobs
This page lists jobs run by all the project members on NERSC machines, with a time-series plot for the jobs on the top and the list of individual jobs at the bottom.
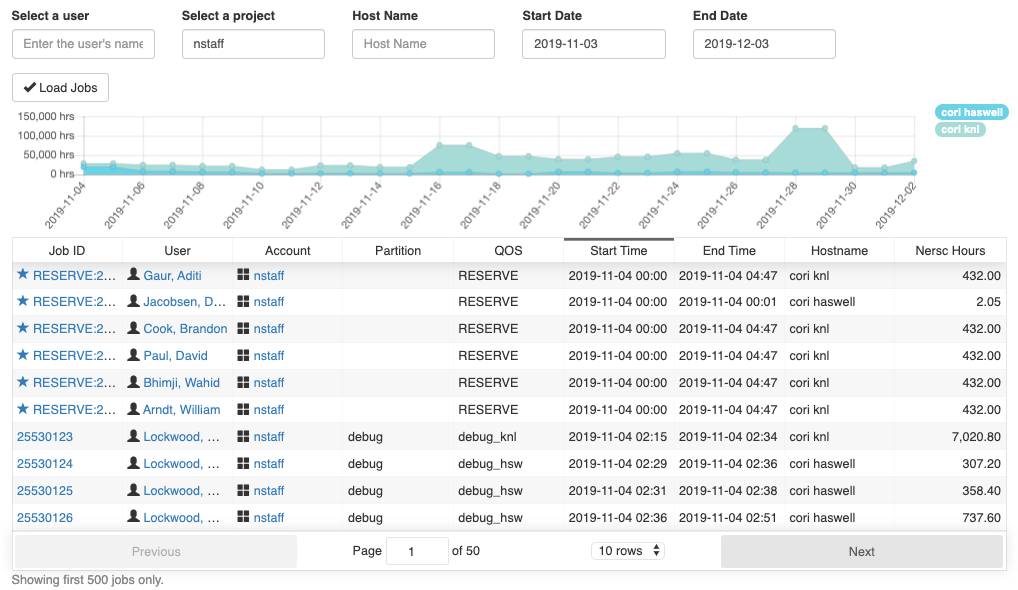
By default, the page lists the jobs run during the past month. To view job data with different start and end dates or for a specific "Host" (e.g., cori haswell, cori knl, ...), etc., enter the appropriate values for your search in the boxes at the top, and click the 'Load Jobs' button.
Clicking on a job ID link from the displayed result, you will see a summary about the job such as host; job name; allocation account; charge info; submit, start and end times; the compute nodes used, etc.
Below there is a section titled 'Job Transfers'. This area provides a record of all deposits and withdrawals made to/from your project's allocation accounts.
At the bottom, there is another section titled 'DataCollect Info'. When the 'More Info' button is clicked, it shows details for individual job steps (that is, individual srun instances), such as the working directory, arguments, srun parameters, etc.
Storage
This area is about your usage of the global home file system and the HPSS archive system.
-
A time-series plot for project space usage is provided at the top of the page.

-
Projects: Space and inode usage logs for the global home file system.
-
HPSS Archive: Space and inode usage logs for the HPSS archive system.
This area shows usage and account settings per user for the project's HPSS allocation. PIs and project managers can assign user quotas in the '% to Allowed' field.
The HPSS storage system tracks usage for each user, but it does not know which allocation account the user belongs to. HPSS user usage information is transmitted to Iris once a day. Iris distributes the user's usage into their storage allocations using their '% to Charge to Project' values. It is user's responsibility to set appropriate percentage values in the user account, if they use multiple allocation accounts. For more info on HPSS charging, please see HPSS archive system.
Roles
This page displays project roles for all members in a project. The possible project roles are: PI (Principal Investigator), PI proxy, Project Resource Manager, Project Membership Manager, User, or No role. The last role is assigned to collaboration accounts.
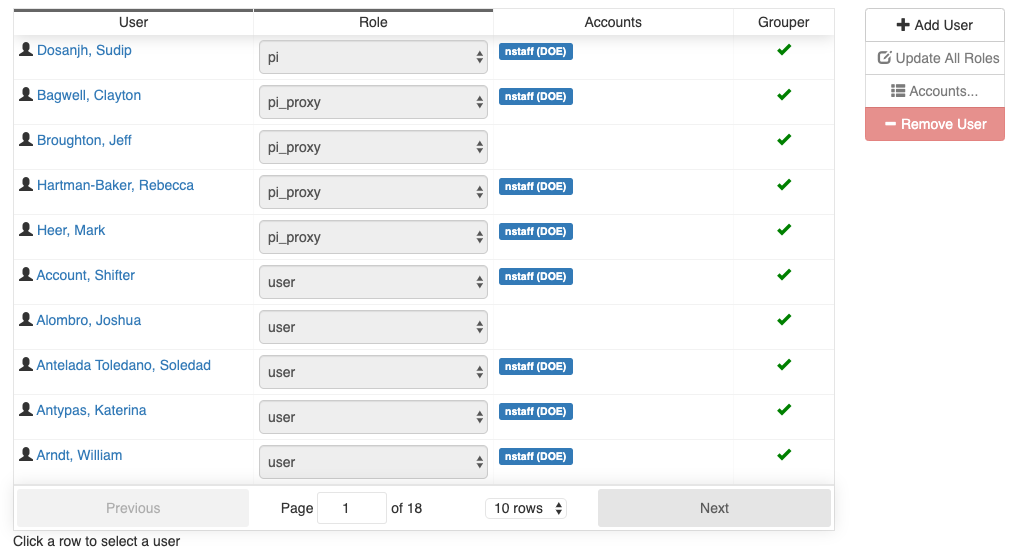
PIs can change the project role for users. Edit a user's role and click the 'Update All Roles' button on the right.
PIs can add or remove users to/from his/her allocation account. To add a user, click the '+ Add User' button on the right. To remove a user, click the '- Remove User' button. The JIG PIs can add or remove users in the 'JGI Accounts' section.
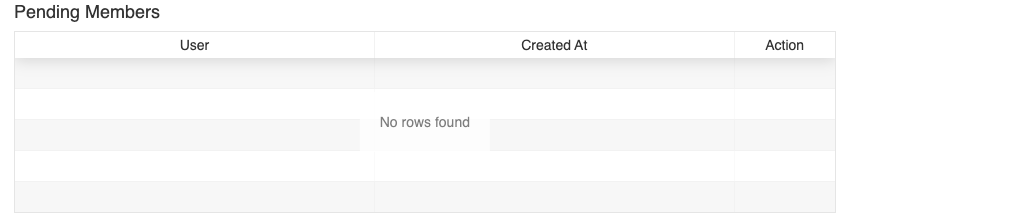
When a PI, PI proxy, or project resource manager adds a user to their allocation account and the user is approved to use NERSC resources, the user will appear in the Pending Members section and the membership can be approved or disapproved.
Groups
The display shows what Unix groups associated with a project allocation account and who are members of each group.
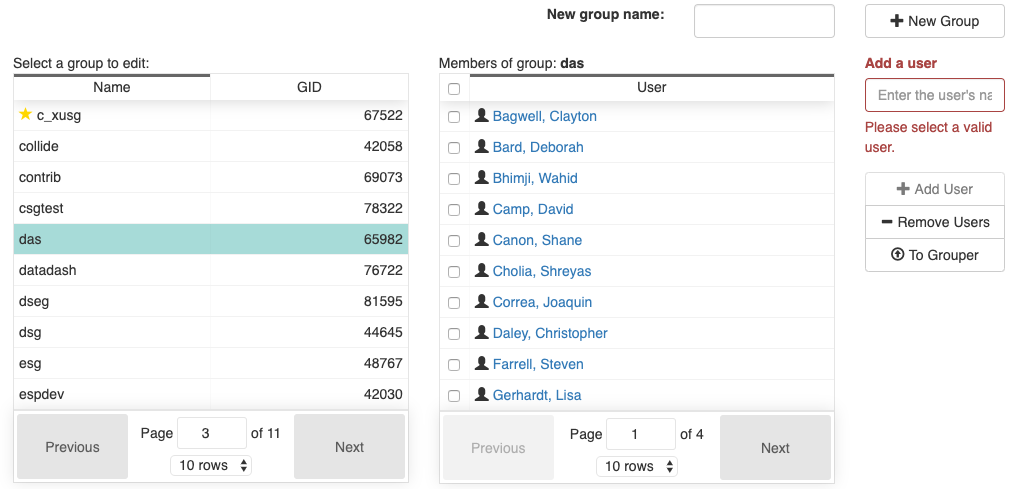
PIs, PI proxies, project resource managers, and project membership managers can request to create a new Unix group by clicking the '+ New Group' button. They can add a user to a specific group or remove a user.
Details
This page shows detailed info about a project itself, such as PI, PI proxies, ERCAP info, DOE Office Science Category, etc.
Reports menus
You can easily generate compute and storage usage reports for allocation accounts with the many report generation options in this menu. For example, you can generate compute usage for a certain date or a month, for an allocation account or a group of accounts. You can filter your search with various categories (start time, end time, submit time, user, project, etc.). You can also examine batch jobs run on NERSC hosts.
To narrow down your search, click the '+ Add Filter' button to add more conditions. Select the field name from the pull-down menu, a comparison operator (=, !=, <, >, <=, >=, contains, starts with, is null, or is not null), and enter the field value, if required. Then, click the 'Run Detailed Report' button to generate results that satisfy the specified conditions.
Daily Compute Report
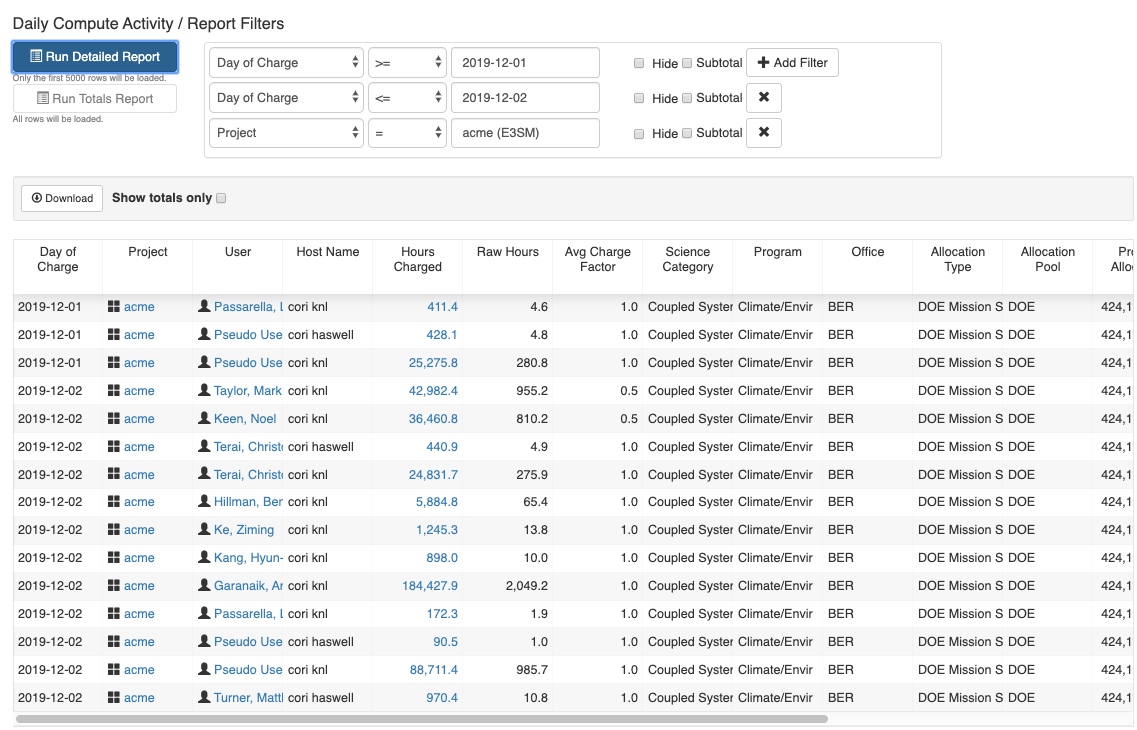
This is to display compute usage for a specified date. The default filter field is by 'Day of Charge' but a different field can be chosen, of course. As stated above, you can add more filters to narrow down your search.
Available filter fields are 'Day of Charge', 'Project', 'User', 'Host Name', 'Hours Charged', 'Science Category', 'Program', 'Office', 'Allocation Type', 'Allocation Pool', 'Project Allocation', 'User Allocation', 'User Allocation Percent', '% Used' and 'Balance'. Note that when you don't filter with an allocation account, you will get a usage report for all allocations.
The following displays the usage data for a project from December 1, 2019 to December 2, 2019:
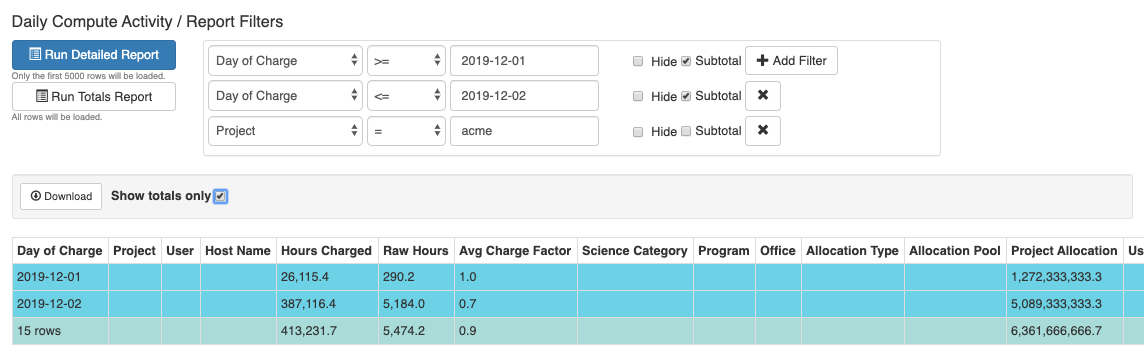
When the 'Subtotal' checkbox in a filter field is marked, some columns show the subtotal values with respect to the selected filter at the bottom of the relevant data block. For example, when the 'Subtotal' boxes are checked for the 'Day of Charge' filters with the above report, subtotal values are shown per day:
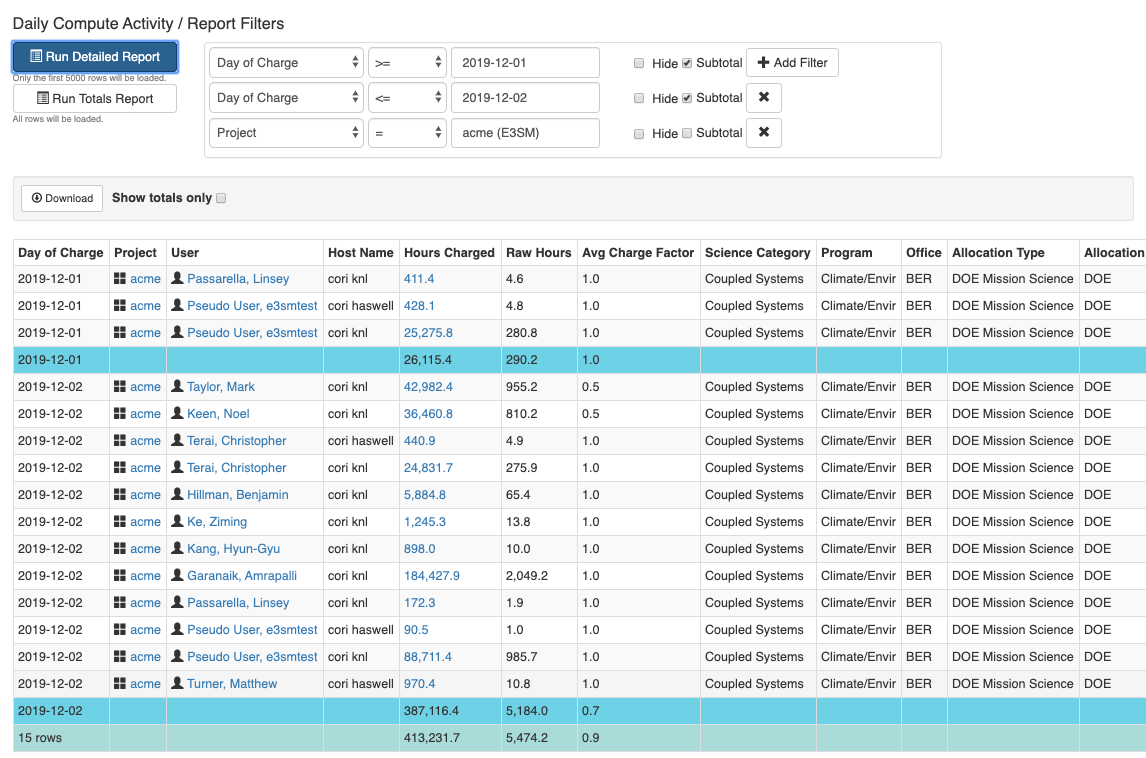
To see only the subtotal values rather than individual values, check the 'Show totals only' box just above the table:
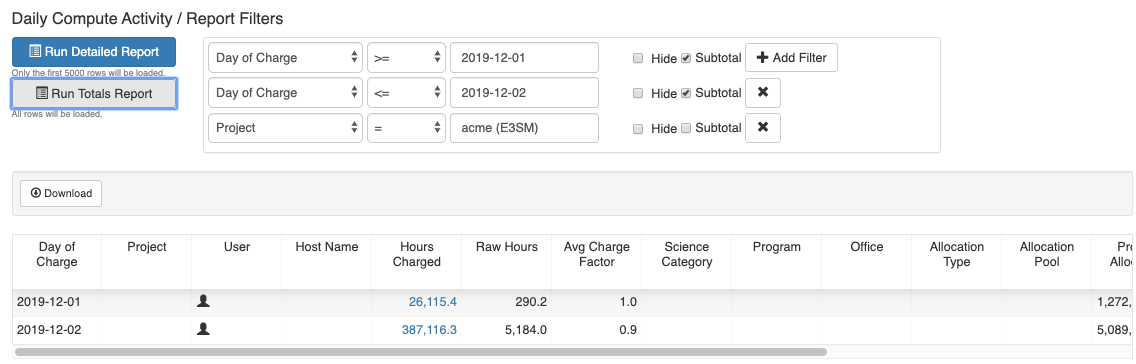
Or you can click the 'Run Totals Report' button instead:
Monthly Compute Report
This is similar to the Daily Compute Report above, but for usage for a month. A month menu will appear when you click the field value box. Select a month and click the 'Run Detailed Report' button.
Daily Project Compute Usage
This is to generate computation time usage per allocation account for a specific date, for example. While the 'Daily Compute Report' returns per-day per-repo per-user records (see above), the 'Daily Project Compute Usage' returns per-day per-repo records.
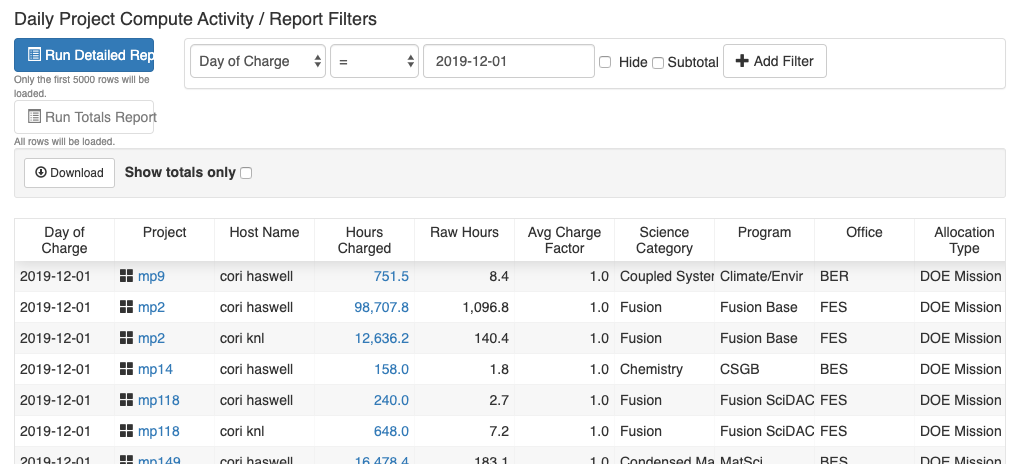
Available filter fields are 'Day of Charge', 'Project', 'Host Name', 'Hours Charged', 'Science Category', 'Program', 'Office', 'Allocation Type', 'Allocation Pool', and 'Project Allocation'. Note that when you don't filter with an allocation account, you will get a usage report for all allocations.
Jobs
You can list users jobs that run on NERSC hosts. Again you can narrow down the search using additional filters. Available filters are 'Start', 'End', 'Submit', 'Wait time', 'User', 'Project', 'Job ID', 'Host Name', 'Partition', 'QOS', 'Elapsed Secs', 'CPUs', 'Nodes Allocated', 'Raw Hours', 'Hours Charged', and 'Reservation ID'.
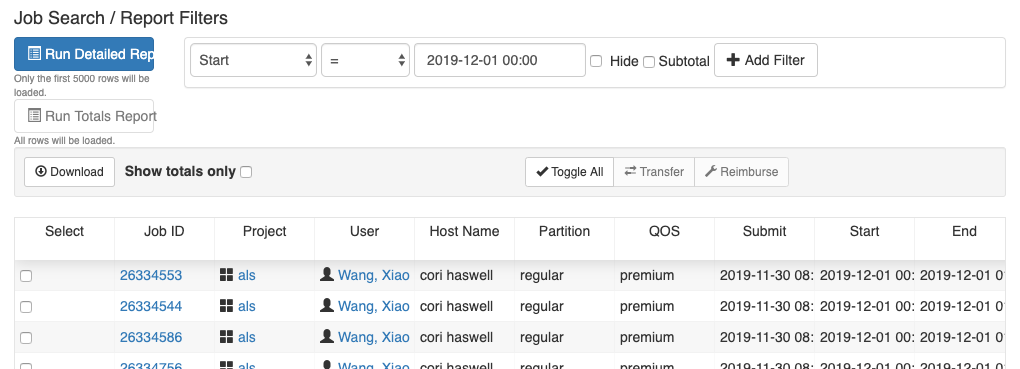
If you click the job ID link, you will see a summary of the job, as before.
YTD Compute Usage
This report generates a year-to-date compute usage summary for an allocation.

Available filters are 'Project', 'Science Category', 'Program', 'Office', 'Allocation Type', 'Allocation Pool', 'Organization Type', 'Organization', 'PI Name', 'Project Allocation', 'Hours Charged', 'Raw Hours', 'Avg Charge Factor', '% Used', 'Balance', 'Storage Used', 'Files Used', 'HPSS Storage Used', and 'HPSS Files Used'.
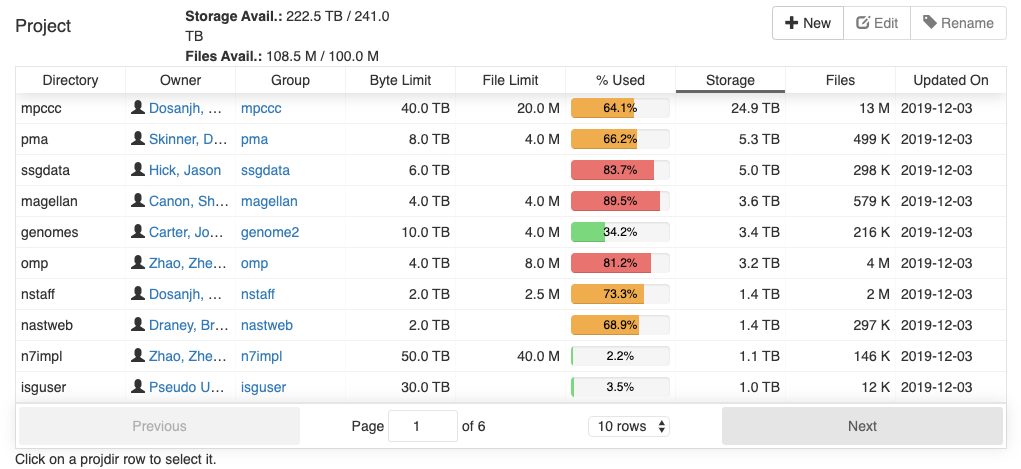
YTD Projdir Usage
This report generates a year-to-date project directory usage summary for an allocation.
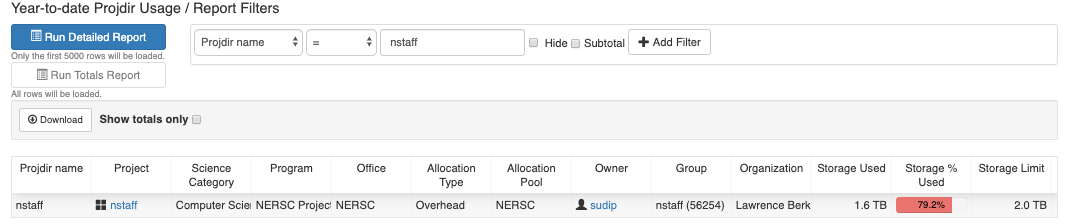
Available filters are 'Project name', 'Project', 'Science Category', 'Program', 'Office', 'Allocation Type', 'Allocation Pool', 'Owner', 'Group', 'Organization', 'Storage Used', 'Storage % Used', 'Storage Limit', 'Files Used', 'Files % Used', and 'File Limit'.
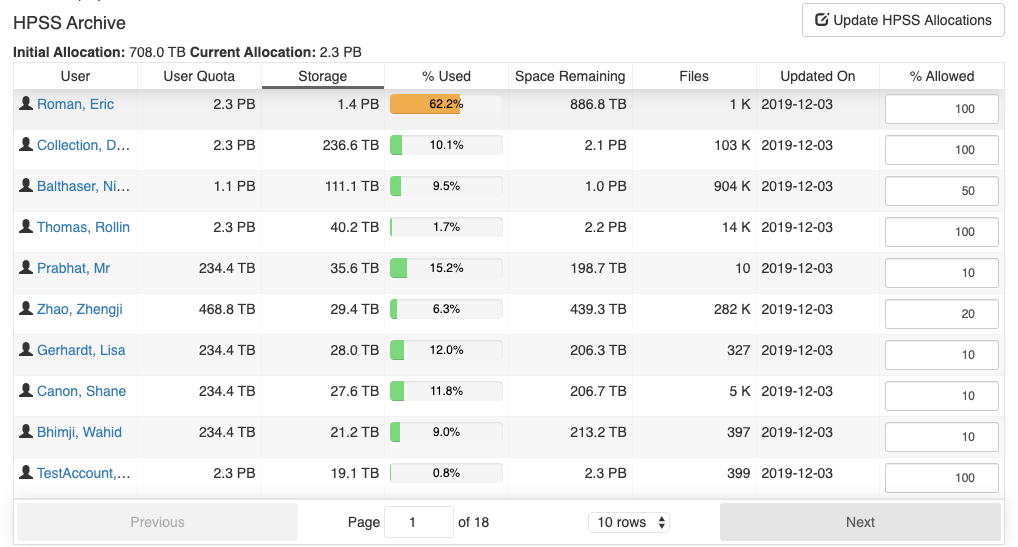
HPSS Usage
This report generates a usage summary of the HPSS archive system.
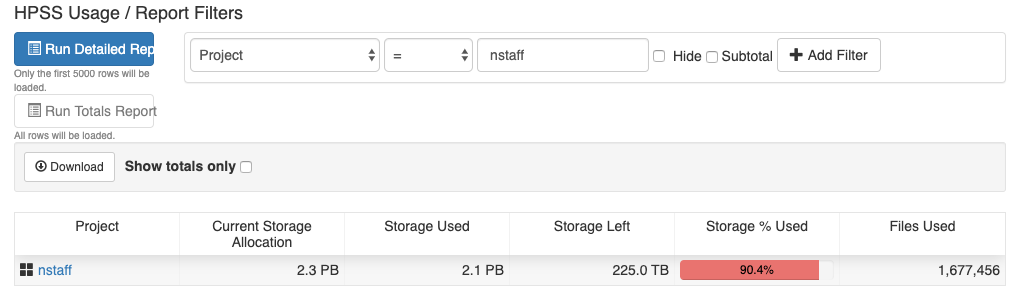
Available filters are 'Project', 'Current Storage Allocation', 'Storage Used', 'Storage Left', 'Storage % Used', and 'Files Used'.
Reserves
The display shows the current allocation reserves for different DOE Offices, and other types.
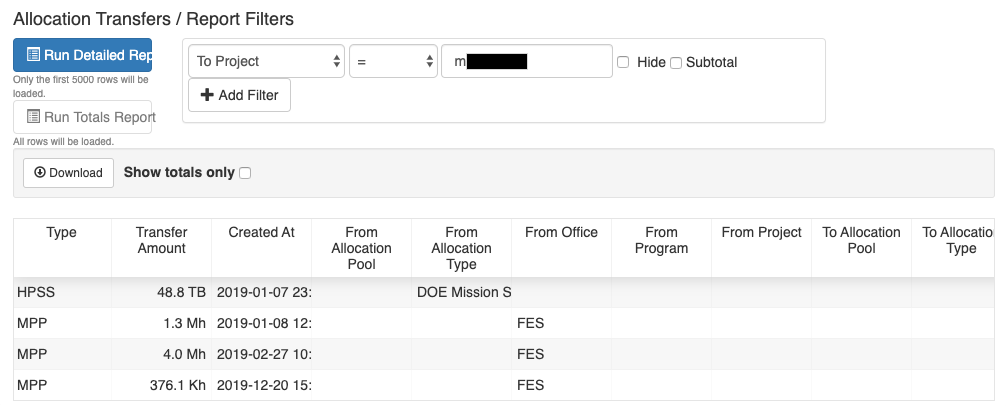
Allocation Transfers
This report generates allocation transfer logs between allocation pools, types, etc.
Available filters for the display are 'From Allocation Pool', 'From Allocation Type', 'From Office', 'From Program', 'From Project', 'To Allocation Pool', 'To Allocation Type', 'To Office', 'To Program', 'User', 'Type', 'Transfer Amount', 'Comments', and 'Created At'.
The following example selects the 'To Project' filter and sets it to a project name, to display transfer logs for the project.
Usage Tracking Report
By default, the display shows the NERSC hours charged, raw hours used and the uniform charge rate plots over all allocation accounts with respect to time since the start of the current allocation year. You can view the plots for a certain allocation account only, by setting the account name, and the resource type (Compute or Storage), and then clicking the 'Graph' button.
![]()