Running Jobs
Enabled to Use the Large Memory Nodes?
The large memory nodes (aka cmem nodes) are accessible via Slurm on the Cori login nodes. If your account is enabled for the large memory nodes, special QOSes for their use are added to your account. To see whether you have gained access, run the following command on a Cori login node. If output contains cmem_exclusive, cmem_interactive, and cmem_shared, you are good to go.
cori$ sacctmgr show assoc user=$USER -p | grep cmem
escori|...|...,cmem_exclusive,cmem_interactive,cmem_shared,...
cori|...|...,cmem_exclusive,cmem_interactive,cmem_shared,...
Submitting Jobs
One can allocate a job on the large memory nodes by submitting a Slurm job from a Cori login node. To do that, you must
- use Slurm's node feature flag,
--constraint=amd(or-C amd), and -
load the
cmemmodule before submitting a job:cori$ module load cmemThis will load the Slurm configuration for external compute nodes (
esslurm), not the Cori main system. This will also render cmem-specific modules visible to users.
Interactive Jobs
The 'interactive' QOS is used generally for code development, testing, and debugging in an interactive batch session. Jobs should be submitted using the interactive QOS:
cori$ module load cmem

cori$ salloc -N 1 -C amd -t 2:00:00 -A mxxxx -q interactive
salloc: Pending job allocation 983046
salloc: job 983046 queued and waiting for resources
salloc: job 983046 has been allocated resources
salloc: Granted job allocation 983046
salloc: Waiting for resource configuration
salloc: Nodes cmem02 are ready for job
cmem02$
Regular Jobs
To submit a job that will make the allocated node(s) exclusively used for the job, you need to specify the bigmem QOS, as shown in the following simple example:
cori$ cat runit
#!/bin/bash
#SBATCH -N 1
#SBATCH -C amd
#SBATCH -t 30:00
#SBATCH -q bigmem
#SBATCH -A mxxxx

srun -n 8 ./a.out

cori$ module load cmem
cori$ sbatch runit
Submitted batch job 983210
Shared Jobs
If you want to run a job on a node where other jobs may run, submit the job with the shared QOS, as shown in the following example.
cori$ cat runit
#!/bin/bash
#SBATCH -n 4
#SBATCH -C amd
#SBATCH -t 30:00
#SBATCH -q shared
#SBATCH -A mxxxx

srun -n 4 ./a.out

cori$ module load cmem
cori$ sbatch runit
Submitted batch job 983235
Monitoring Jobs
You can check the status of a job using squeue and sqs. However, before running these commands, make sure the cmem module is loaded.
To restrict output to only the jobs on the large memory nodes, add the -p cmem flag. Otherwise, the command output will include jobs running on other external compute nodes (e.g., Cori GPUs), too.
cori$ module load cmem

cori$ squeue -p cmem -u $USER
             JOBID PARTITION     NAME     USER ST       TIME  NODES NODELIST(REASON)
            985096      cmem       sh    elvis  R      23:09      1 cmem02
Queues and QOS
Tentatively we have set the following queues and policies. Note that these can be adjusted based on user usage and needs.
| QOS | Max nodes | Max time (hrs) | Submit limit | Run limit | QOS Factor | Charge per Node-Hour |
|---|---|---|---|---|---|---|
| interactive | 48 | 2 | 2 | 1 | 140 | |
| bigmem | 48 | 5000 | - | 1 | 140 | |
| shared1 | 48 | 5000 | - | 1 | 140 |
Note that usage on the nodes will be charged at the same rate as the Cori Haswell nodes. For information on how jobs are charged please see the NERSC usage charging policy.
If your job requires resources outside the queue limits, you can request to schedule a node reservation. For information, please see the Reservation page.
Process and Thread Affinity
Below is the graphical output from the lstopo command, which reveals the internal configuration of CPUs and memory access for the NPS1 NUMA topology.
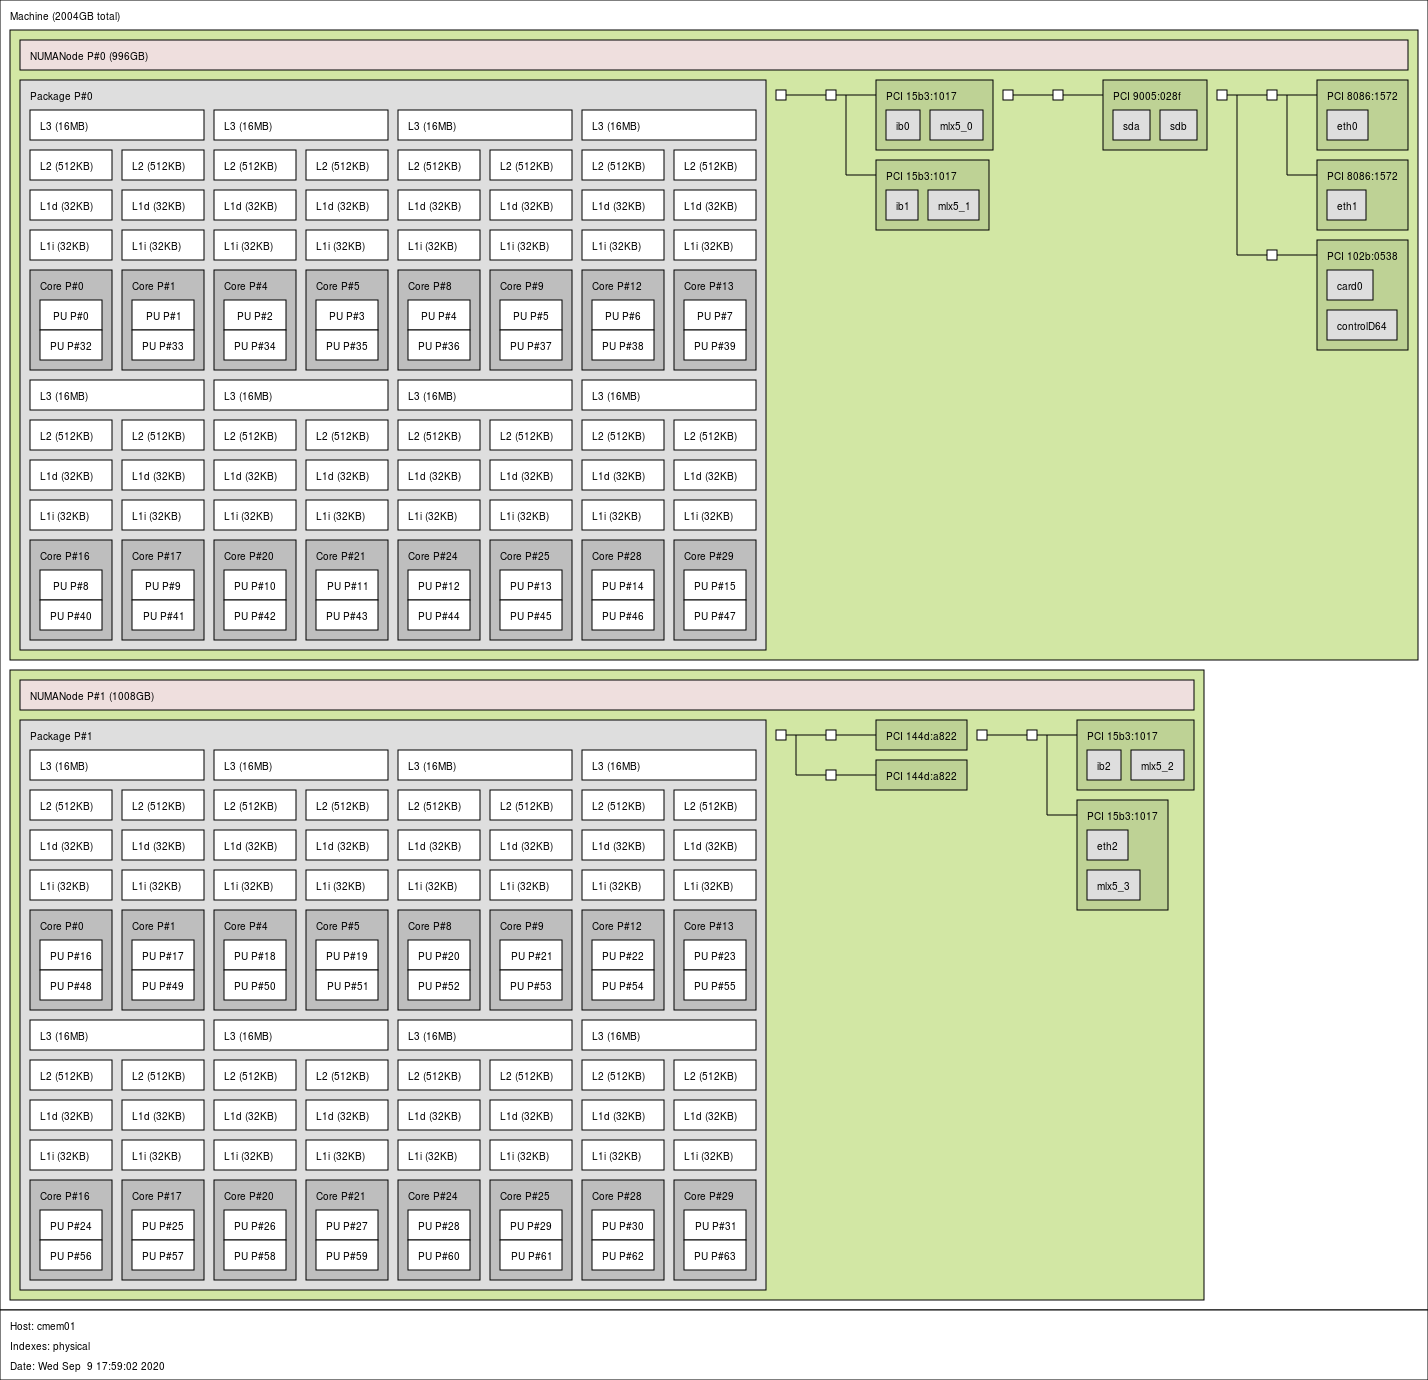
From a programmer's perspective, we can summarize the layout as follows:
-
A large memory node is partitioned into two NUMA nodes, each with 2 TB / 2 = 1 TB for local memory access.
Accessing remote memory takes more time.hwloc-distancesprints the relative latency value of 3.2 for remote memory access (which, according to its man page, may or may not be accurate):cmem$ hwloc-distances Relative latency matrix between 2 NUMANodes (depth 1) by logical indexes (below Machine L#0): index 0 1 0 1.000 3.200 1 3.200 1.000A STREAM memory benchmark test (gcc; array size of 560 million) exhibits a bandwidth difference depending on whether local memory is used (see the 16 thread case below).
OpenMP threads NUMA node(s) for threading Triad bandwidth (GB/s) with NUMA node(s) for memory 0 1 0 and 1 16 0 86.9 50.8 - 32 0 and 1 73.1 73.4 172.8 -
There are 16 cores on a NUMA node.
- There are two hardware threads (or "logical" CPUs) - denoted by PUs in the diagram - per core. These are equivalent to logical CPUs for Intel's "hyperthreading."
- In total, a cmem node has 2 NUMA nodes, 32 cores and 64 hardware threads. In terms of the numbers of NUMA nodes, cores and logical CPUs only, the configuration with the NPS1 NUMA topology is similar to a Haswell node.
- Each core has its own 32-KB L1 data and 512-KB L2 caches.
- A 16-MB L3 cache is shared between two neighboring cores.
For the underlying computer architecture, please check the Node Features section.
The numactl -H command returns the following result:
cmem01$ numactl -H
available: 2 nodes (0-1)
node 0 cpus: 0 1 2 3 4 5 6 7 8 9 10 11 12 13 14 15 32 33 34 35 36 37 38 39 40 41 42 43 44 45 46 47
node 0 size: 1019907 MB
node 0 free: 1012309 MB
node 1 cpus: 16 17 18 19 20 21 22 23 24 25 26 27 28 29 30 31 48 49 50 51 52 53 54 55 56 57 58 59 60 61 62 63
node 1 size: 1032179 MB
node 1 free: 1023277 MB
node distances:
node   0   1
  0:  10  32
  1:  32  10
NUMA node 0 has logical CPUs 0-15 and 32-47. Note that these CPU IDs are shown as the PU P# numbers in the picture above. The first ID range is for the first hardware threads of the cores on the NUMA node, and the second for the second hardware threads. CPUs 0 and 32 are on the same core (Core P#0), CPUs 1 and 33 are on Core P#1, and so on. Likewise, NUMA node 1 has logical CPUs 16-31 and 48-63.
Binding processes and threads to CPUs properly is important for getting good code performance. Detailed info on how to achieve this by using a combination of OpenMP environment variables and runtime flags can be found here. Below we list only info relevant to cmem.
-
Pre-built executables from a small test code
xthi.cwith pure MPI or hybrid MPI/OpenMP that can be used to check affinity are provided in user's default path. They arecheck-mpi.<compiler>.cmemandcheck-hybrid.<compiler>.cmemwhere<compiler>can beintel,gnu,cceorpgi.
The following example is to run 4 MPI tasks, 4 OpenMP threads per MPI task on a node. The MPI tasks are spread out on both NUMA nodes. SettingOMP_PLACES=threadswill result in each thread binding to a specific CPU. SettingOMP_PROC_BIND=spreadspreads out 4 threads among 16 CPUs allocated to each task:cmem01$ module load intel cmem01$ module load openmpi-cmem cmem01$ export OMP_NUM_THREADS=4 cmem01$ export OMP_PLACES=threads cmem01$ export OMP_PROC_BIND=spread cmem01$ srun -n 4 -c 16 --cpu-bind=cores check-hybrid.intel.cmem | sort -n -k 4,6 Hello from rank 0, thread 0, on cmem01. (core affinity = 0) Hello from rank 0, thread 1, on cmem01. (core affinity = 2) Hello from rank 0, thread 2, on cmem01. (core affinity = 4) Hello from rank 0, thread 3, on cmem01. (core affinity = 6) Hello from rank 1, thread 0, on cmem01. (core affinity = 16) Hello from rank 1, thread 1, on cmem01. (core affinity = 18) Hello from rank 1, thread 2, on cmem01. (core affinity = 20) Hello from rank 1, thread 3, on cmem01. (core affinity = 22) Hello from rank 2, thread 0, on cmem01. (core affinity = 8) Hello from rank 2, thread 1, on cmem01. (core affinity = 10) Hello from rank 2, thread 2, on cmem01. (core affinity = 12) Hello from rank 2, thread 3, on cmem01. (core affinity = 14) Hello from rank 3, thread 0, on cmem01. (core affinity = 24) Hello from rank 3, thread 1, on cmem01. (core affinity = 26) Hello from rank 3, thread 2, on cmem01. (core affinity = 28) Hello from rank 3, thread 3, on cmem01. (core affinity = 30)If you are unsure about the process and thread binding that occurs within your application's run, you can check it using the test executables with the same number of nodes, MPI tasks and OpenMP threads. Alternatively, you can display affinity info by adding '
verbose' tosrun's--cpu-bindvalue (or set the environment variableSLURM_CPU_BIND). -
You can set the
srun's-cvalue for the number of logical CPUs allocated per MPI task on a node. This value should equal at least the number of threads per MPI task when running a multithreaded application. You can go higher for better code performance, but the maximum value is limited by the number of MPI tasks placed per node. For this upper limit, use the formula, 'floor(32 / (number of MPI tasks per node)) * 2'. For example, to run with 12 MPI tasks per node, the-cvalue can be set to up to 'floor(32/12)*2', which is 4. - If you want to use the job script generator tool to get optimal process and thread binding for your application, select 'Cori - Haswell' as the machine type -- it will produce correct output for the node architecture. Note that you have to modify the output's Slurm directives for the correct architecture and QOS values.
-
Jobs in the "shared" QOS are only charged for the fraction of the node used. ↩